In this technical guide, we will write an ERC721 smart-contract to mint an NFT-collection on the Ethereum blockchain, based on Open Zeppelin4, 5, 6, 7 library and than put it for sell on the OpenSea3 and Blur2 marketplaces.
So, what do you need to create an NFT collection on Ethereum from the pictures you have, as a developer?
- Develop and deploy an ERC721 smart-contract in a test chain
- Mint NFT with this contract
- Place the NFT on a marketplace (Blur, OpenSea etc.).
- Repeat the steps 1 – 3 in a real blockchain (Ethereum)
Let’s go through the steps.
1. Develop and deploy an ERC721 smart-contract in a test chain
Here is the code of the ERC721 smart-contract written in Solidity and automatically generated by Open Zeppelin Wizard7. It is the best practice, since Open Zeppelin is considered as safe and secured library.
// SPDX-License-Identifier: MIT
pragma solidity ^0.8.9;

import "@openzeppelin/contracts/token/ERC721/ERC721.sol";
import "@openzeppelin/contracts/access/Ownable.sol";

/// @custom:security-contact ilya@bewebi.com
contract MonsterPets is ERC721, Ownable {
    constructor() ERC721("Monster Pets", "MOP") {}

    function _baseURI() internal pure override returns (string memory) {
        return "https://BeWebi.com/";
    }

    function safeMint(address to, uint256 tokenId) public onlyOwner {
        _safeMint(to, tokenId);
    }
}
The contract supports:
- Mintable feature
safeMintto actually mint NFTs. onlyOwnermodificator, which is used to restrict access to some functions.
To generate this code go to Open Zeppelin Wizard https://docs.openzeppelin.com/contracts/4.x/wizard
Change Name, Symbol, Base URI and Security contact and the code will be generated automatically on the fly.
Put a slash “/” in your Base URI, since it is the address which will be concatenated with an NFT name, for instance: https://BeWebi.com/12, where 12 is an NT id to be concatanated.
Before entering the Name check it’s availability on sepolia.etherscan.io by searching it, since it is not allowed to have duplicate names: in this case your contract will be compiled, but it will throw an error during the verification process.


We put our own URL (https://BeWebi.com) as the Base URI – it is a place, where we will store our NFTs; it is done for testing purposes. Yeah, you’ve read that right, the NFT pictures can, actually, be stored anywhere. But a good practice is to use distributed file systems, like IPFS9 or Swarn10 as a storage in order for the pictures not to get lost in case of losing access to hosting.
How does this smart-contract work?
- We import Open Zeppelin libraries with already written:
- ERC721 smart-contract template:
import "@openzeppelin/contracts/token/ERC721/ERC721.sol"; - Modificator
onlyOwnerto restrict access for some functions:import "@openzeppelin/contracts/access/Ownable.sol";
- ERC721 smart-contract template:
- Contract
MonsterPetsinherits Open Zeppelin contractERC721 constructorcreates a name and a symbol for our NFT collection._baseURImethod will help to maptokenIdwith it’s relevant meta data off-chain.safeMintfunction will mint NFTs.
Go to to Remix8, paste the code and deploy it the contract in Sepolia test chain.


Than go to your MetaMask and add Sepolia test network to your wallet. We will deploy the contract there.

Get some free Sepolia-Ether to your wallet, we will need it to pay for the gaz. You can get free Ether from a Sepolia faucets, like this one, for instance: sepoliafaucet.com (it will ask you to create an Alchemy account to be sure that you are not a spammer). Than enter your Sepolia wallet address and hit “Send Me Eth”:

Switch your MetaMask to Sepolia, than go to “Deploy and run transactions” in Remix and choose “Injected Provider – Metamask” in Environment settings, find the Contract “MonsterPets”. Hit Deploy button and sign the transaction.

In your MetaMask account press confirm:

As a confirmation you will see that the contract is deployed:

Click “view on etherscan” to view the deployed smart-contract on sepolia.ethersan.io:

Here is how the deployment transaction looks like: https://sepolia.etherscan.io/tx/0xf7e508bb0392fdee3197b86f6ac15a4b21da8ae0cbf1535ec24787c9457ae638

And here is the contract itself: https://sepolia.etherscan.io/address/0xa2e6e4f23f7b8d3173148b2bf4fbf9cc41ccab0d

Got to Contract button and Verify the contract by putting the source code:

Fill in the necessary fields and click Continue:

To fetch the single flatten file from Remix and put it into Sepolia for verification go to Remix File Explorer, select your contract “.sol” file, right click and choose “Flatten”:

Remix will leave the first line empty. You need to enter the license there, as you did it in the source contract code. If you don’t do it the verification process in Sepolia network will fail with error.


Go back to the verification page and put the flattened code there, choose the compiler version (0.8.9 or higher is ok in our case):

Hit “Verify and Publish” button and you should see the success page:

Now we have the contract name “MonsterPets” and verification check mark.

Our contract is published here: https://sepolia.etherscan.io/address/0xa2e6e4f23f7b8d3173148b2bf4fbf9cc41ccab0d
Now you can interact with the deployed contract via Read and Write functions:


2. Mint NFT with the deployed ERC721contract
To call the Write functions you need to connect your MetaMask wallet (or Wallet Connect, or Coinbase wallet) via “Connect to Web3” button and then you will be able to make calls to all of this functions, including the minting ones.

If you want to call the Read functions, no need to connect your wallet.
Another way to call the read and write smart-contract functions is to do it right from the Remix. For this you need to go to “Deploy and run transactions”, choose your wallet in the Environment, your deployed contract or enter your address at “At address” option and push the relative button (“At address”). But we are not going to use this approach.

Let’s mint an NFT.
Go to “Write contract” functions and open the function “safeMint” (don’t forget to connect your wallet)

Enter your wallet address in “to (address)” field, which will own the minted NFT and input the “tokenId” – it is the NFT id (let it be “1”). Click “Write” and confirm it in your wallet.


You will see pending status first in your wallet:

And confirmation as final step:

You will be able to view your transaction:

Click the image in the details to see NFT details:

You will see the NFT details:

Now you can go to Read contract functions and check URL of the minted NFT in the tokenURI function (enter “1” in tokenId) and you will see the URL aftr the “tokenURI…string”: https://BeWebi.com/1

So, if we put an image to this address it will be shown in NFT details.
3. Place the NFT on a marketplace
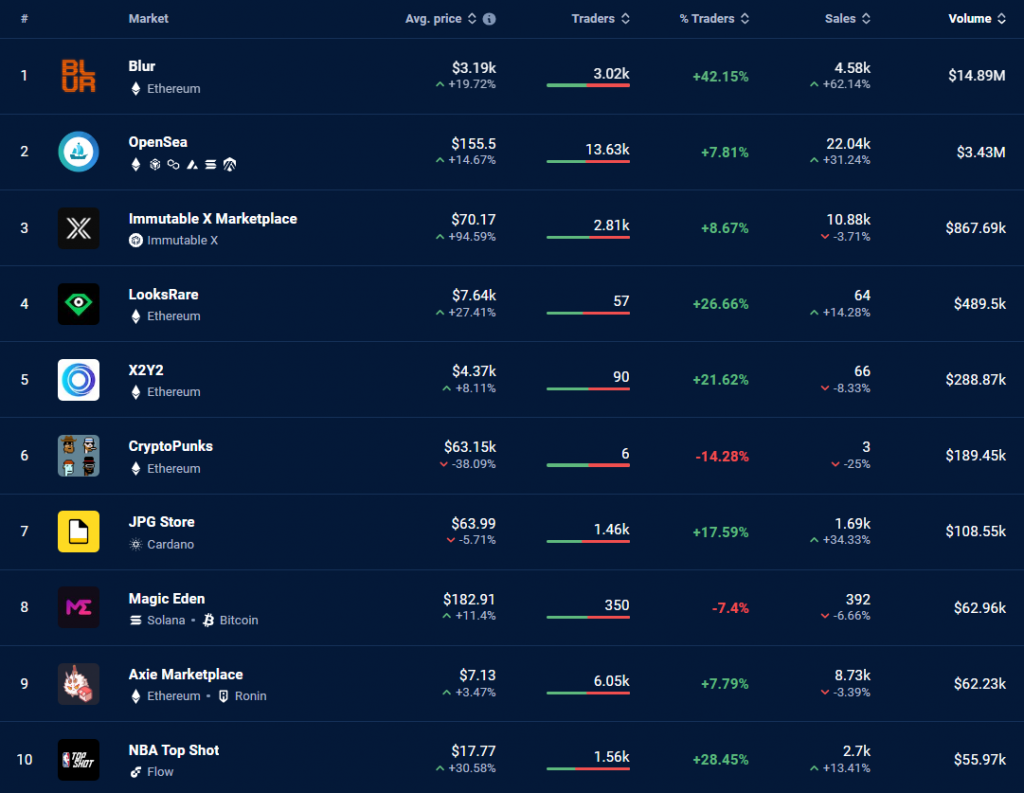
There are a lot of popular platforms that allows you to sell NFTs, some of them include Blur, OpenSea, Binance, Blur, X2Y2, CryptoPanks, LooksRare, Magic Eden. But the best ones as of 2023 are Blur and Open Sea – they have more than 90% of the market share1.

Blur2 specializes on Ethereum as soon as OpenSea3 will help you to launch and sell NFT on 9 blockchains (Optimism, Polygon, BNB Chain, Arbitrum, Base, Ethereum, Solana, Avalanche, Klaytn).
You can put your minted NFTs on OpenSea.io2 marketplace or on Blur.io3
Links:
- Top NFT Marketplaces by DappRadar: https://dappradar.com/rankings/nft/marketplaces
- Open Sea: https://opensea.io
- Blur: https://blur.io
- Open Zeppelin: https://www.openzeppelin.com
- Open Zeppelin GitHub repository: https://github.com/OpenZeppelin
- Open Zeppelin ERC721 smart-contract: https://github.com/OpenZeppelin/openzeppelin-contracts/tree/master/contracts/token/ERC721
- Open Zeppelin smart-contract Wizard: https://docs.openzeppelin.com/contracts/4.x/wizard
- Remix: https://remix.ethereum.org
- IPFS: https://filebase.com
- Swarn: https://www.ethswarm.org
